Input

book: Create a structured PDF document with headings, chapters, etc.
webpage: Specifies that the HTML sources are unstructured (plain web pages.) A page break is inserted between each file or URL in the output.
continuous: Specifies that the HTML sources are unstructured (plain web pages.) No page breaks are inserted between each file or URL in the output.
Title of the document for the front page.
Extract the first heading of the document and use it as title. If checked the title field has no effect.
The title image or HTML page. These file has to be an attachments!
Specify document version to be displayed on the title page.
Intellectual property owner of this document.
Copyright notice for this document.
Information about who and when modified the document are applied at the end.

Output

Specifies the output format.
Grayscale document  Title page
Compression :   JPEG big images 

Pagina

 
User defined page size 
Choose one of the predefined standard sizes or select user defined.
Specifies the page size using a standard name or in points (no suffix or ##x##pt), inches (##x##in), centimeters (##x##cm), or millimeters (##x##mm).
Set the target browser width in pixels (400-1200). This determines the page scaling of images.
   2-Sided   Landscape


Specifies the margin size using points (no suffix or ##x##pt), inches (##x##in), centimeters (##x##cm), or millimeters (##x##mm). Keep empty for default value.
Left
Middle
Right
Sets the page header to use on body pages.
Left
Middle
Right
Sets the page footer to use on body pages.

Indice

Sets the number of levels in the table-of-contents. Empty for unlimited levels.
   Numbered headings Check to number all of the headings in the document.
Sets the title for the table-of-contents. Empty for default title.
Left
Middle
Right
Sets the page header to use on table-of-contents pages.
Left
Middle
Right
Sets the page footer to use on table-of-contents pages.

Colors

Enter the HTML color for the body (background).
Enter the image file for the body (background). These file has to be an attachments!
Enter the HTML color for the text.
Sets the color of links.
Enables generation of links in PDF files.

Fonts

Set the default size of text.
Set the spacing between lines of text.
Choose the default typeface (font) of text.
Choose the default typeface (font) of headings.
Set the size of header and footer text.
Choose the font for header and footer text.
Change the encoding of the text in document.
Check to embed font in the output file.

PDF

Controls the initial viewing mode for the document.
Document: Displays only the docuemnt pages.
Outline: Display the table-of-contents outline as well as the document pages.
Full-screen: Displays pages on the whole screen; this mode is used primarily for presentations.
Controls the initial layout of document pages on the screen.
Single: Displays a single page at a time.
One column: Displays a single column of pages at a time.
Two column left/right: Display two columns of pages at a time; the first page is displayed in the left or right column as selected.
Choose the initial page that will be shown.

Security

Check to number all of the headings in the document.
 Versione stampabile   Modify
 Copy   Annotate
Specifies the document permissions.
Specifies the user password to restrict viewing permissions on this PDF document. Empty for no encryption.
Specifies the owner password to control who can change document permissions etc. If this field is left blank, a random 32-character password is generated so that no one can change the document.

Expert

Specify language to use for date and time format.
Shrink code blocks on page.
Show line numbers for code blocks.
Make spaces visable by dots (·) instead of white spaces.
Make line breaks visable by a extra character (¶) at the end.
Enable this feature if you searching for problems or intent to report a bug report

About

Version 2.4.2 (MoinMoin 1.9.7)


MoinMoin - Generate PDF document using HTMLDOC

This action script generate PDF documents from a Wiki site using
the HTMLDOC (http://www.htmldoc.org) software packages which has
to be preinstalled first.

Copy this script in your's MoinMoin action script plugin directory.

Thanks goes to Pascal Bauermeister who initiated the implementaion.
Lot of things changes since then but the idear using HTMLDOC is the
main concept of this implementation.

Please visit the homepage for further informations:
http://moinmo.in/ActionMarket/PdfAction

@copyright: (C) 2006 Pascal Bauermeister
@copyright: (C) 2006-2010 Raphael Bossek <raphael.bossek@solutions4linux.de>
@license: GNU GPL, see COPYING for details


Italiano English
Modifica History Actions

PowerOverEthernet

Power Over Ethernet (POE)

POE è un metodo per inniettare una tensione continua in un cavo ethernet per alimentare dispositivi remoti (come gli access point usati in ninux o videocamere ethernet)

In commercio esistono diversi inniettori POE come questo:

  • align="right"

(Image from http://wifimarket.eu)

All'atto pratico non è altro che un alimentatore collegato a 4 fili non in uso nello standard 802.3 come riportato da wikipedia

Se sei un amante de DIY ecco come ricostruirlo.

DIY

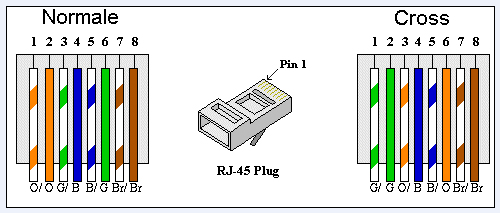
Preso un cavo ethernet i pin 1-2-3-6 sono per i dati con rispettivamente le coppie 1-2 e 3-6 (biancoarancio-arancio e biancoverde-verde).

Gli altri (4-5 e 7-8) possono essere usati a coppie per portare corrente: 4-5 (blu-biancoblu) per il positivo 7-8 (biancomarrone-marrone) per il negativo
Ethernet-Cable.png

I colori a cui faccio riferimento sono lo standard utilizzato in tutti i cavi ethernet come in figura.

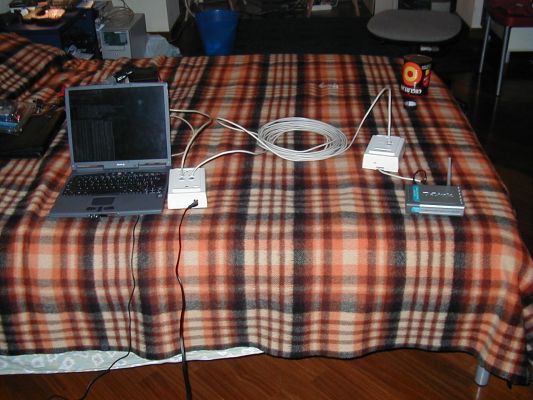
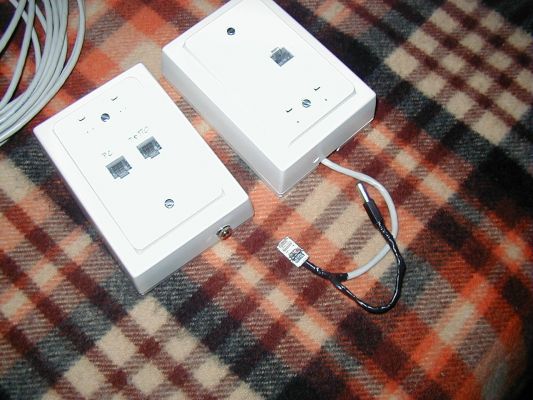
Di seguito un esempio di costruzione effettuato per un l' alimentazione di alcuni access points D-Link dwl-900ap+; tutto il necessario per potere costruirne uno in casa come quello da noi realizzato è:

  • 2 scatolette con le rispetive piastrine sulle quali si agganciano le prese rj-45 da pannello
  • 3 prese rj-45 da pannello
  • un pezzo di cavo ethernet cat. 5
  • un connettore femmina da pannello (come quello che avete sull'apparato che volete alimentare)
  • un connettore maschio volante (come quello che trovate attaccato all'alimentatore del vostro apparato)

Come potrete vedere dalle foto, abbiamo voluto costruire un power-over-ethernet più "pulito" possibile, in modo da poter utilizzare qualsiasi tipo di cavo ethernet (dritto o crossover) e, così come lo vedete, comprese le scatole e 10 m di cavo ethernet cat 5, ci è costato 23€. La spesa volendo può essere ridotta anche a circa 10-12€ se ci rinuncia alle due scatolette con le rispettive piastrine che ospitano le prese ethernet da pannello. LE PROVE Abbiamo provato il nostro sistema in casa con un cavo ethernet da 10 m e non ci sono perdite notevoli di corrente nel filo. Il sistema dovrebbe tranquillamente essere alimentato dall'alimentatore in dotazione al access point D-Link dwl-900ap+ che eroga 2A massimi anche con cavi di lunghezza superiore. Questo access point ha un assorbimento di circa 500mA utilizzato da un solo client, ovvero 1/4 di quello erogabile dall'alimentatore. I CALCOLI Quando si usa il power-over-ethernet occorre considerare che il cavo ethernet che si utlilizza per arrivare sul tetto ha una sua resistenza che sarà più alta quanto più lungo sarà il cavo. Occorre quindi applicare alla base un voltaggio maggiore di quello che desiderate avere sul tetto. Qui sotto c' è uno script che calcola quando deve essere il voltaggio alla base del power-over-ethrernet affinche arrivi sul tetto la tensione che desiderate. L' AWG potete leggerlo sul vostro cavo ethernet, ma gran parte di quello comunemente in commercio oscilla tra 22 e 24. Volendo trovare una soluzione che potesse valere per più situazioni possibile, abbiamo studiato un sistema per alimentare il power-over-ethernet, senza modificare gli Access Point, sempre a 5V, esiste in commercio un filtro che permette di tagliare una tensione di 5-12V sempre a 5V. Questo filtro ha un costo irrisorio, ma permette di costruire un power-over-ethernet sempre sicuro che non sovralimenti il nostro caro apparato.
poweroverethernet1.jpg poweroverethernet2.jpg